If you’ve always wanted to learn how to crochet but felt overwhelmed by where to start — this guide is for you. In this step-by-step beginner crochet tutorial, you’ll learn the three absolute basics: how to make a slip knot, how to crochet a foundation chain, and how to work the single crochet stitch. I’ll walk you through each step with clear pictures and instructions.
When I first started crocheting, I thought everything could be made just by chaining. But before long, I realized that chains are only the foundation — the real magic of crochet comes from the basic stitches that build on it. Simple stitches like single crochet (sc), half double crochet (hdc), and double crochet (dc) are the building blocks of almost every project. From these basics, countless other stitches and textures are created, bringing life and variety to your crochet work.
What You need?
For every crochet project, you will need some basic tools. I suggest that if you are a beginner, start with acrylic yarn in medium weight. It’s the best choice for beginners — not too small and not too big. To understand different yarn weights you can visit the link here.
While there are many types of yarn blends, acrylic is especially suitable because it glides easily on the hook and doesn’t slip as much.
Next, you’ll need a crochet hook. For beginners, the best option is a metal hook, as it’s easier to use and moves more smoothly over the yarn compared to a wooden hook. The size of the hook should be 5mm(H-8).
You will also need a tapestry needle to sew in your ends once you complete your project, and a pair of scissors to finish things off. You might also need stitch markers for some projects to ensure that the number of stitches is same throughout the project or to maybe identify the a starting point in the circle.
How to make a slip knot
Making a slip knot is the very basic and the first step you need to do in order to make any project. Now there are many ways to make a slip knot but I find this way to be the easiest


- Leave a generous yarn tail (about 4 inches) and hold the yarn across your index finger.
- Wrap the yarn around your finger to form a simple loop.
- Cross the working yarn (the strand attached to the ball) over the tail end.


- Wrap the tail end of the yarn around your finger so it forms a small V shape.
- Use your other finger/ hook to pull the working yarn (the strand attached to the ball) through the loop, creating a new loop on your hook.
- Gently tighten by pulling on both the tail and the working yarn — and you now have a slip knot secured on your hook, ready to start chaining.
Don’t make the slip knot too tight and the hook should be able to move inside the slip knot.
How To make Foundation Chain
Now up is making the foundation chain. The Foundation chain is literally the foundation of out project and we build any types of stitch on top of this foundation chain.
There’s no single “correct” way to hold your yarn — it’s about what feels natural in your hands. I loop the yarn over their index finger of the non-dominant hand i.e. my left hand to keep a gentle tension, while the remaining fingers hold the yarn tail. I hold the crochet hook in the right hand.
At first it may feel a little clumsy, but with practice your hands will find their own rhythm. The goal is simply to keep the yarn flowing smoothly, not too loose and not too tight.


To make an fc simply yarn over and pull through the loop. this makes 1 foundation chain but you need to make several foundation chains for any project.
Single Crochet
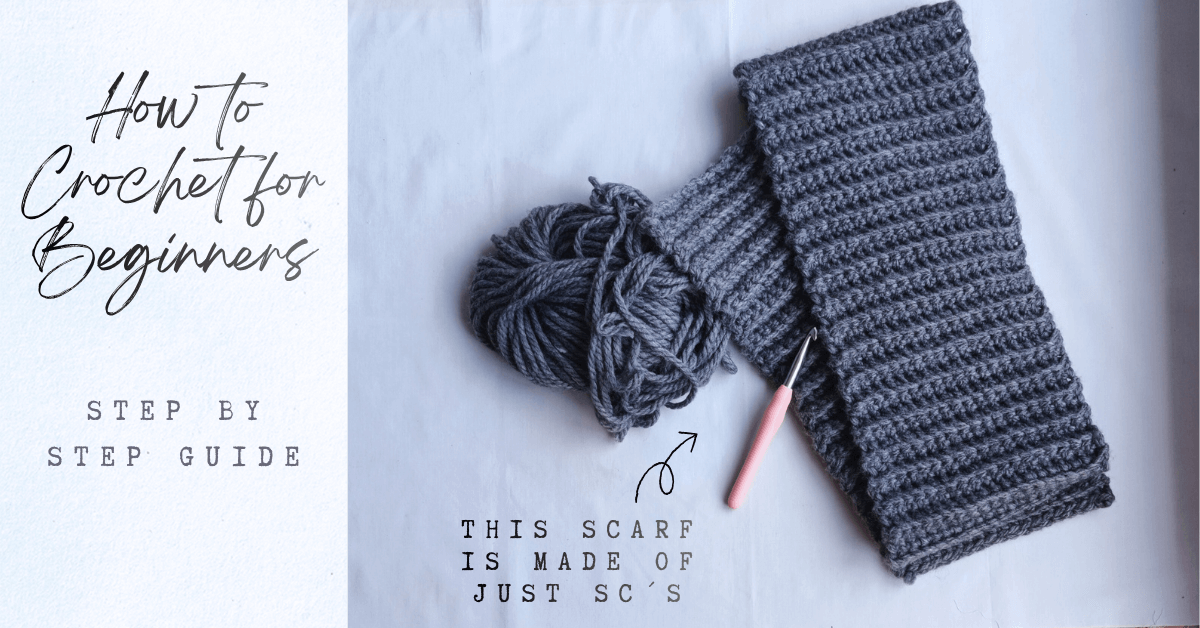
Single crochet is the most simplest crochet stitch and you can make a lot of things with it. When I started I made a scarf just by using single crochet and I will link it at the end of this tutorial.


- Skip the chain right next to the hook and insert the hook in the next stitch
- Yarn over (wrap the yarn over the hook).


- Pull the yarn through the stitch — you now have two loops on your hook.
- Yarn over again and pull through both loops on the hook.

now make these single crochets till the end of the row.
To create a panel or a square of sc
- Chain 1: This acts as the turning chain for single crochet and gives the row the right height.
- Turn your work: After finishing the first row, flip your project so you can start working back across the stitches.
- Insert your hook: Put your hook into the first stitch of the previous row (not the turning chain).
- Yarn over and pull through — you now have two loops on your hook.
- Yarn over again and pull through both loops. That completes one single crochet stitch.
- Repeat: Continue making single crochet stitches in each stitch across the row.
What to do if the edges are wonky, curled up or crooked?
A good thing as a beginner would be to use stitch markers at the start and end of the project And always count the stitches. So lets say if you have a fc of 12 make sure that it should be 11 for the next round excluding 1 turning chain. Try to clearly locate your last stitch sometimes it happens that the last stitch goes unnoticed and therefore the project starts getting crooked.
p.s. One of the best ways to stay motivated as a beginner is to see what’s possible with the skills you’re learning. The scarf in the featured image is a perfect example — it’s made entirely using single crochet in the back loop, a simple variation of the stitch that I will be covering in another blog post.
To conclude, I hope you enjoyed this tutorial and hope this gives you the motivation to make a project of your own or just start crocheting. I worked hard to create this tutorial and really enjoyed and so I hope to see in my next blog post. Happy Crocheting!


